Categories
5 of the Best Exercises for Lower Back Pain
How frequently do you experience lower back pain?
We live in a world where a large percentage of people spend most of their time sitting down.
Whether that be on the way to work, during work, coming home from work and watching TV or doing work at home, it’s no wonder our bodies are breaking down. We are not designed to spend the majority of our lives sat down for such long periods of time.
When you sit all day, you know what your glutes and calves are doing? Pretty much nothing — except slowly wasting away. Being hunched over a computer all day causes havoc to your posture too which in turn can also lead to back pain.
Back pain is on the rise, so what’s the best way to handle it?
I (Charles) want to share my experiences when it comes to back pain and the exercises that I have used to become lower back pain free, however, it’s not a magic pill.
Being DISCIPLINED AND CONSISTENT is the key to the success of these exercises.
Since starting these series of exercises I have gone from crawling out of bed in the mornings and into bed at night, to being able to live my life 95% lower back pain FREE.
And the below exercise routine is responsible for this.
How do we go about reducing back pain?
First of all, let’s take a look at the mechanics of what we need to do to reduce lower back pain.
We need correct stabilisation, something called ‘intra-abdominal pressure’. Imagine the abdominal wall as a cylinder. When all the muscles in the core are synchronised and the load is spread out throughout the whole cylinder, intra-abdominal pressure is created and the spine is stable. By achieving this, we avoid putting too much strain on specific muscles or areas of the spine.
Top 5 Exercises:
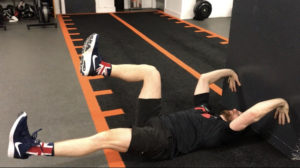
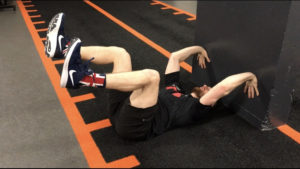
1.The Deadbug
The goal of a Dead Bug is to activate our superficial and deep core musculature while our limbs are in motion. If you play sports or walk/run/live life, you’ll understand that you are always moving around grabbing, catching turning around, rotating; these positions require spine stability and core stability… don’t be that person who blows their back out from bending down to pick up the shopping (it’s all too common!)
How to Deadbug


Lie on your back with your arms extended in front of your shoulders.
Bend your hips and knees to a 90-degree angle.
Tighten your abs and press your lower back into the floor.
Take a deep breath in, the breath needs to be full stomach of air, breathing in HARD through the nose.
Slowly extend your left leg toward the floor and bring your right arm overhead. Keep your abs tight and don’t let your lower back arc.
Slowly return your arm and leg to the starting position Exhale as you are coming back in, imagine blowing out a candle above you, breath out hard and controlled.
Repeat with your opposite arm and leg. Continue alternating.
3 Common mistakes with the deadbug that you need to avoid
Not using the bracing sequence
Losing tension at the bottom of the movement
Bringing the knees too close to the chest.
Recommend rep range
2-3 sets of 8-10 each side
2.The Bird-Dog
Okay so imagine the EXACT same movement as the deadbug, but on your hands and knees, the bird dog is teaching you how to maintain a strong ‘core’ whilst moving your arms and legs at the same time which mimics the most simple of tasks – WALKING
How to Bird-dog
Start on your hands and knees, have your wrists under the shoulders and knees under the hips.
Breath in hard through the nose expanding the rib cage out filling the stomach with air
Extend the arm out straight with the thumb pointing to the sky pushing out HARD whilst the OPPOSITE back leg is pushing out pulling the toes to the shin
It is important in that position to push both limbs away as hard as possible.
Keep the foot just a few cm’s off the ground.
Breath out hard as you return arms and legs to start position. Repeat 5-8 times on one side then change.
3 Common mistakes people make with the bird-dog
Leg coming up too high
Not using the bracing sequence
Not pushing the floor away and relaxing at end ranges
Recommend rep range
2-3 sets of 5 each side
3.The Side-Plank
The obliques (muscles on the side of the waistline) play a role in helping to stabilise the spine, it would make sense to ensure that they are working correctly. When performing the side plank, rather than holding for time, you are better off holding for an extended amount of breaths whilst bracing like we mentioned before.
How to Side Plank
Lie down on one side,
Place the elbow under the shoulder so it’s in one line
Keep the legs straight with the knees locked and place the top foot over the bottom foot
Once ready push yourself up onto the side with the hand facing down pressing the floor away as hard as you can, which will engage the lats which creates more stability and tension around the spine.
3 Common Mistakes people make with the side plank
Too much rotation of the hips leaning over
Hips are not high enough
Arm above shoulder level
Recommend rep range
2-3 sets of 8-10 breaths each side
4. Stirring the Pot
When engaging in “core” training, for me the goal anterior -posterior stability of the entire pelvic-hip area, ability to resist anti-extension forces increased core endurance on anti rotational forces.
As Dr Stu McGil has mentioned, make planks harder not longer as they serve little to no benefit the longer you hold. Generally the cut off point for a plank for me is around 30-60 seconds, after that, we need to start making the plank more challenging.
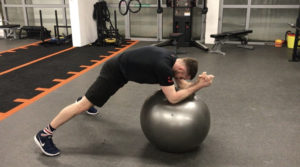
A good progression to challenge the plank is ‘stirring the pot’ performed on a swiss ball.
How to Stir the Pot

Set up on the ball with hands together, brace the core, squeeze the buttocks, feet outside hip width, feeling a strong position.
Move the elbows in circular fashion 5-15 times clockwise, then 5-15 anti clockwise.
Ensure that it is only the arms moving direction, keeping the hips still with minimal rotation whilst bracing the ‘core’.
To challenge more from here, create bigger circles, narrow the stance, have someone move the ball around.
3 Common Mistakes people make whilst stirring the pot
Hips are to low or too high
Allowing the hips to move around rather than staying still
Not breathing correctly
Recommend rep range
2-3 sets of 10-15 rotations each side
5. Pallof Press
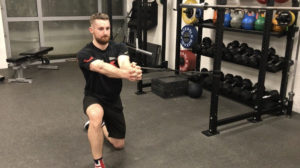
You can either use muscles to move things or prevent things from moving, the isometric Pallof press variations are by far some of my favourites.
What the Pallof press does is it challenges and strengthens the stabilization action of your abs, it forces your core to resist the rotation or compression of your spine, which forces your entire core to engage. The anti-rotation action of the Pallof essentially prevents the spine from being thrown out of its safe position through unnatural twists and bends.
How to do the Pallof Press

Set up either a band or cable machine parallel to you.
From the side, grab the cable or band (if banded step or move out creating tension)
Hold the cable, band into the chest, take a big breath in through the nose, expanding the rib cage.
Holding that breath, push the cable/band out in front of you holding end range for 2-3 seconds then breathing out hard through the mouth whilst coming back in.
It’s imperative that you keep the hips as still as possible and using the breath and ‘core’ to do the work. Repeat 8-12 times.
3 Common mistakes with the Pallof Press
Going too heavy or creating too much tension
Shrugging up too much with the shoulders (tension in the neck)
Rotating with the band
Recommend rep range
2-3 sets of 8-10
These exercises performed daily have helped myself and thousands of people become pain free, but the key here is discipline and consistency to carry them out.
If you have any questions on the above or would like some advice on how we could help you with your fitness goal, don’t hesitate, visit our gym and try one of our personal training sessions.
Related Articles
- Core Exercise for Lower Back Pain
- Can Exercise Banish Lower Back Pain?
- How To Train Around Lower Back Pain
- Why Wont My Nagging Back Injury Clear Up?
- 4 Steps to Reduce Back Pain

